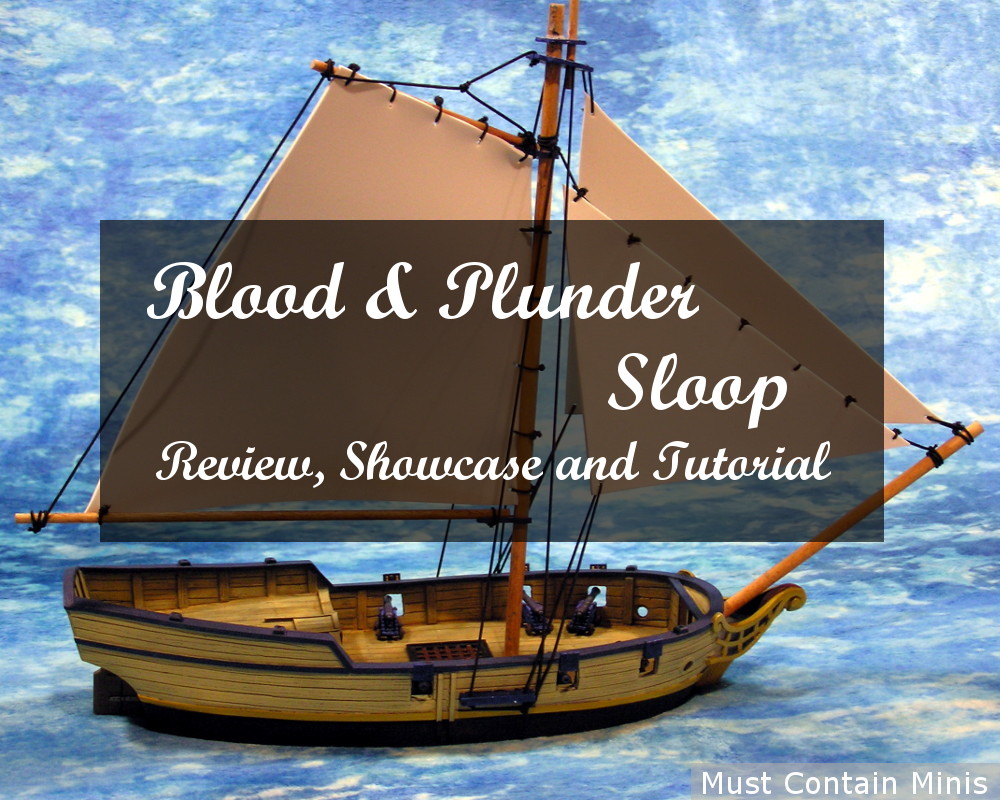
In this article, we Review the Sloop for Blood and Plunder (by Firelock Games) and provide a Tutorial on how to rig the sails of the ship. Overall, this is a fantastic miniature and when it is put together, it is absolutely gorgeous. The ship is so nice that I actually have mine up on display in the living room of my house. The only other time that a miniature gets featured so prominently on the main-floor of my home is when my miniatures come out to invade my wife’s Christmas Village. 🙂
In the interest of full disclosure, Firelock Games sent Must Contain Minis this Sloop along with a French Starter Box and the Rules of the game for Review Purposes. Thank you very much Firelock Games for sending us these materials.
The Review
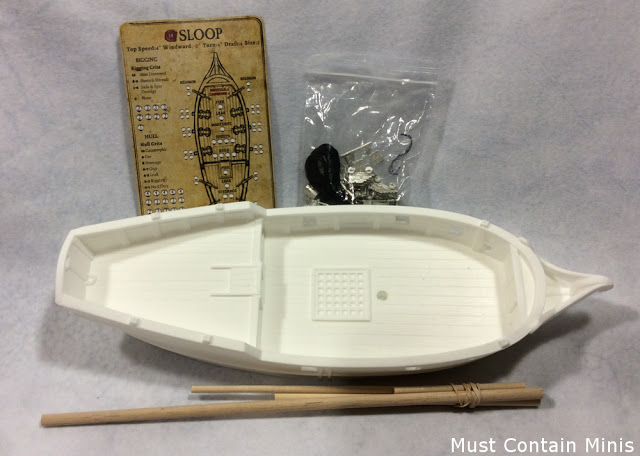
After playing Blood & Plunder my first time, I knew that these ships look amazing once they are built. The Sloop’s hull came as below. It needed a bit of a wash as there was still some release agent (or some sort of other residue) left on the model.
To make this ship extra special, Jeremy Cada (a commission painter and friendly local store owner) painted the hull for me. When it came back, it looked awesome!
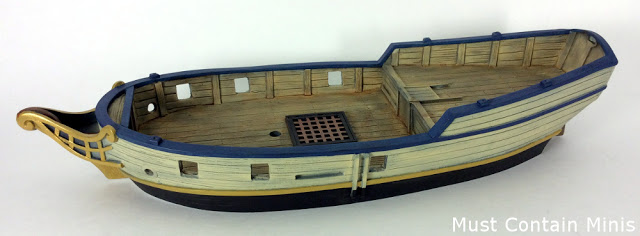
Some people would stop at this level and play the game with the model as above. To me, that would be acceptable as it would be easier to place the figures on the ship. You could even add the Mainmast and Bowsprit for extra effect without adding the rigging.
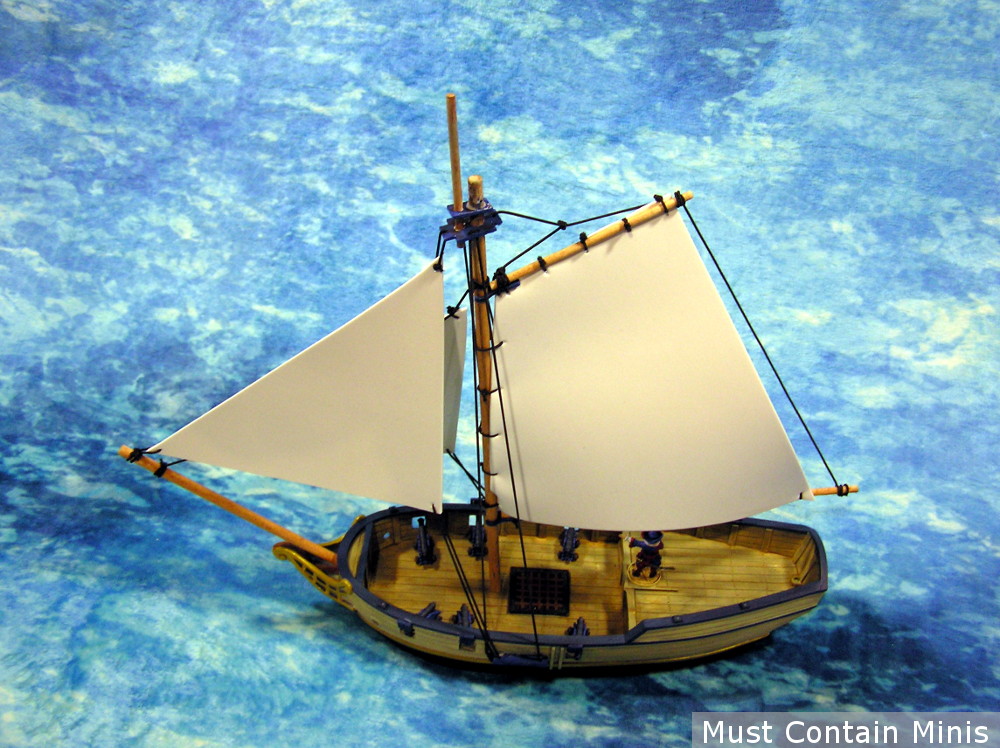
While you could end the build there, check out how awesome this model looks once you rig up the sails!
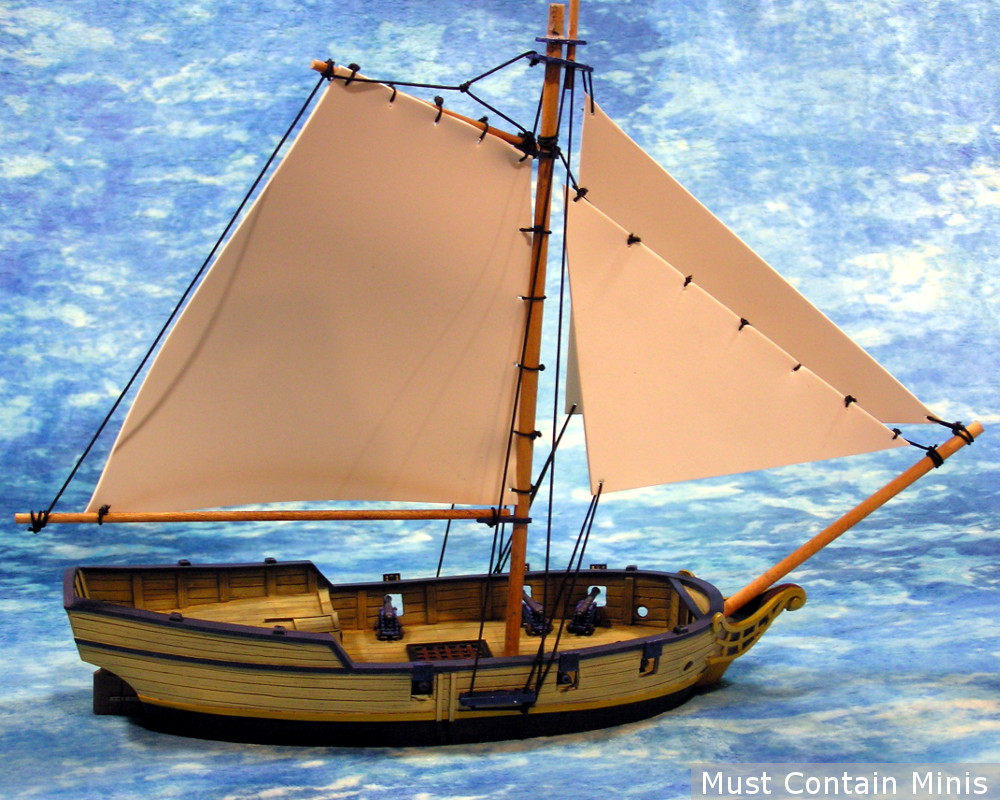
The ship looks fantastic and is definitely a showcase piece. It was a fairly easy piece for Jeremy to paint up quickly and the result is superb.
Pros
- Looks absolutely stunning once built.
- Single piece hull so there is not too much to build.
- It feels sturdy.
- Fairly simple to rig and get looking good.
- The Blood & Plunder Miniatures fit well on the decks of the ship.
- It was the most affordable Blood & Plunder Ship. There are now two even more cost effective ships for Blood & Plunder. It is still a fairly affordable model.
Cons
- I had to file down one of the hull’s slits to fit the rigging point into the side of the ship. That said, the model was already painted, so I am not sure if the lack of fit was due to casting or paint. After some filing, it went together nicely.
- The instructions for rigging the ship are not at the level that I desire.
- It can be intimidating to rig sails if you never done it before.
- I was missing a part. I don’t know if I just lost the piece or if the product shipped without it.
The ship looks fantastic, but it took me a long time to get up the nerve to rig the ship. There are some rigging guides on the Firelock Games Downloads Page, but the guides are not that detailed. The templates work well, yet the picture below shows all of the instructions for the rigging. This diagram was not quite enough for me. I wanted some instructions more along the lines of “How to Rig your Firelock Games’ Sloop for Dummies.” Since I could not find simple rigging instructions for a Blood and Plunder Sloop, I decided to write my own.
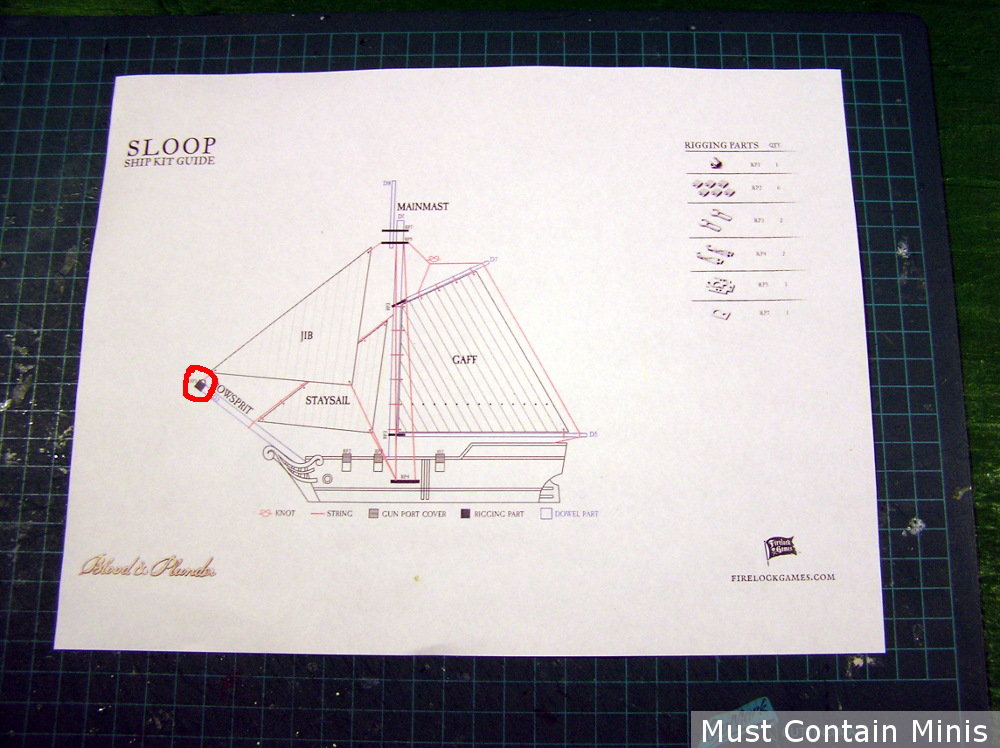
Searching the web, I found some Youtube Videos and pages about rigging model ships in general but nothing for this specific ship. Since completing the model, I learned of an excellent article on the 1000 Foot General about rigging your Blood and Plunder Sloop. John’s approach is a little more advanced than my own but worth a look. If you want a simpler guide, continue reading this page. There are also more showcase pictures of the Sloop at the end of this article.
Rigging your Blood & Plunder Sloop – For Dummies
First of all, rigging the ship is much more intimidating than it is difficult. There are multiple ways to rig this ship. The way I completed the task is not the only way to do the job;. That said, this approach very much builds the Sloop as per Firelock Games’ diagram. To create the sails, I used foam-sheets and cut them to match Firelock Games’ templates. I then used my pin-vice to drill holes into the foam-sheet as per the template.
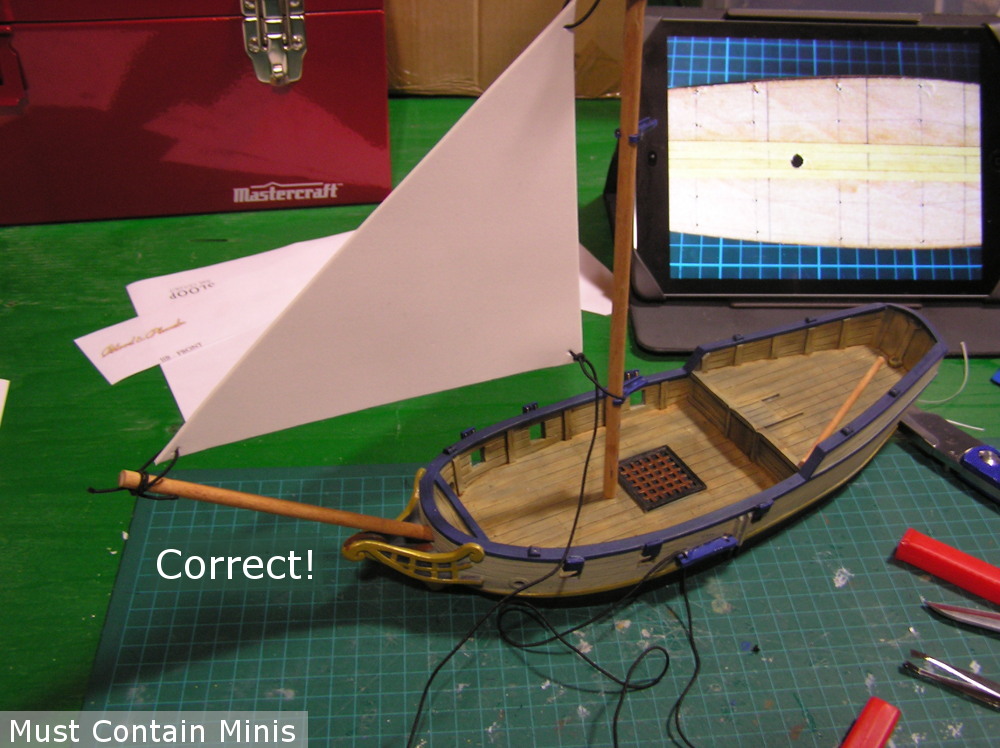
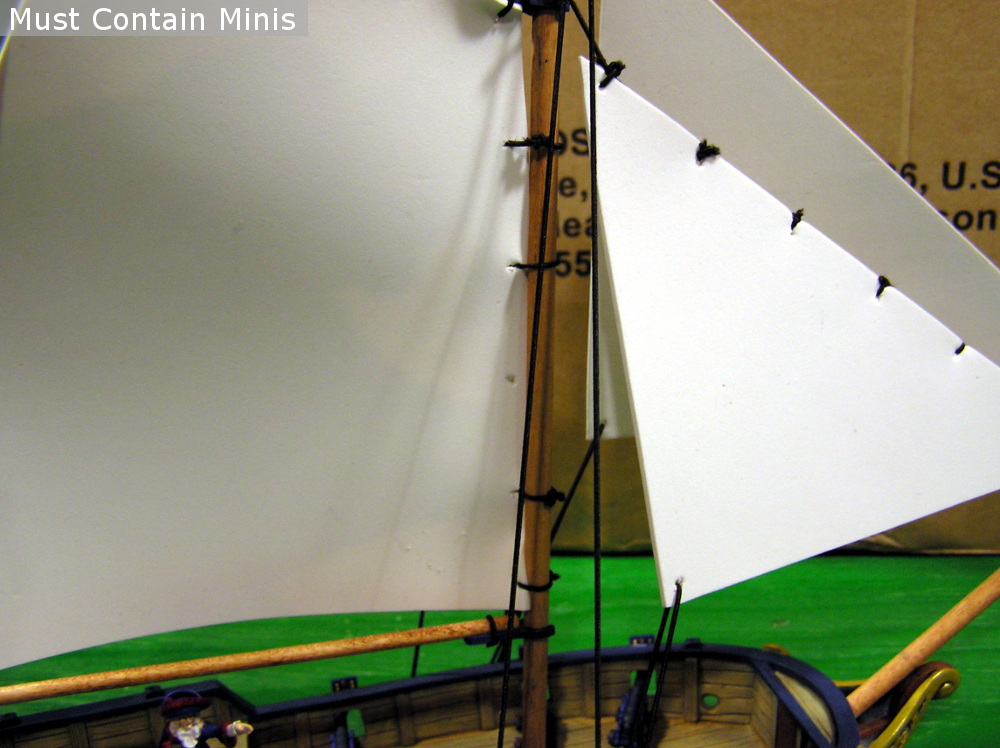
Right off the start, I made a mistake. I tried stringing the Jib Sail straight through. That approach did not work. See the picture below.
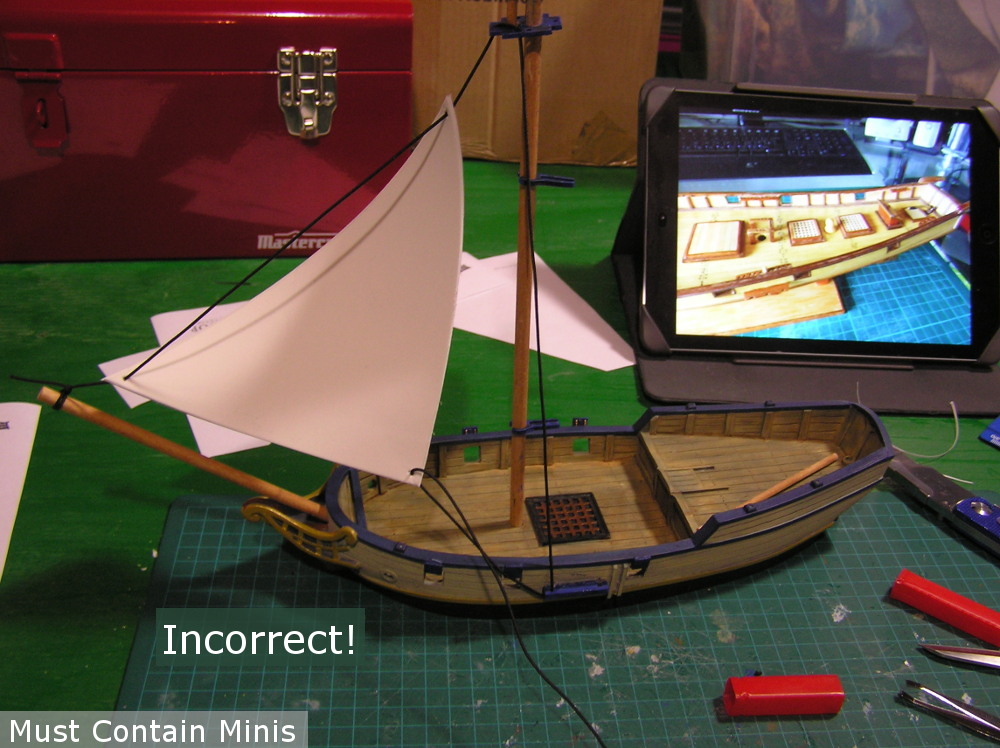
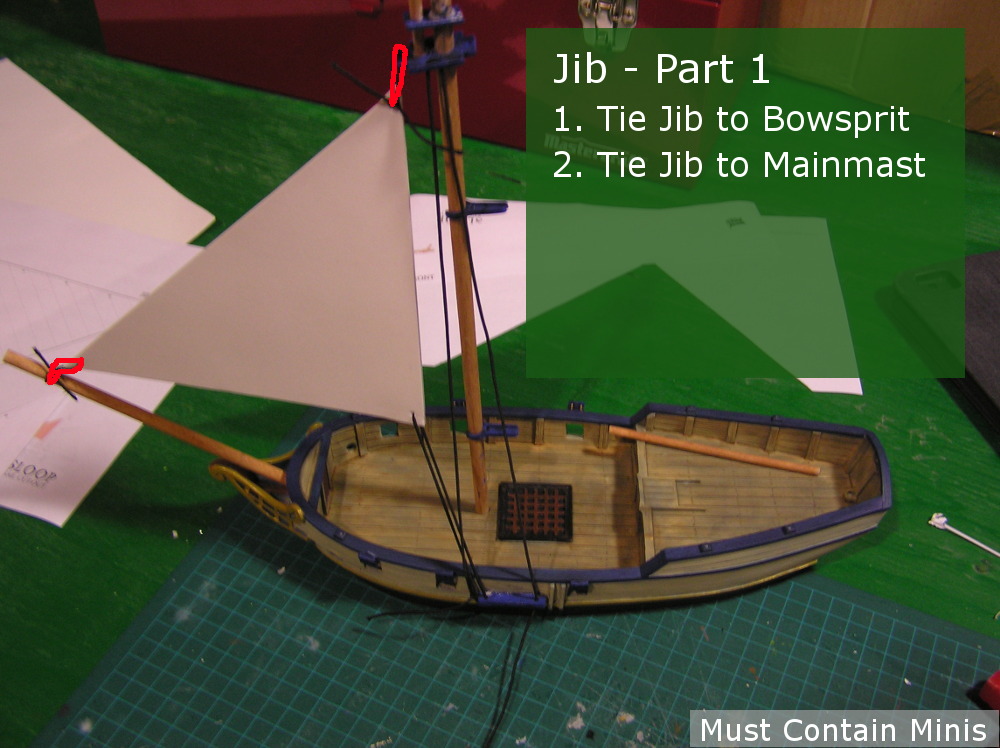
I investigated the Firelock Games’ diagram closer and noticed that they tied separate strings to the top and bottom of the jib, so that is what I did.
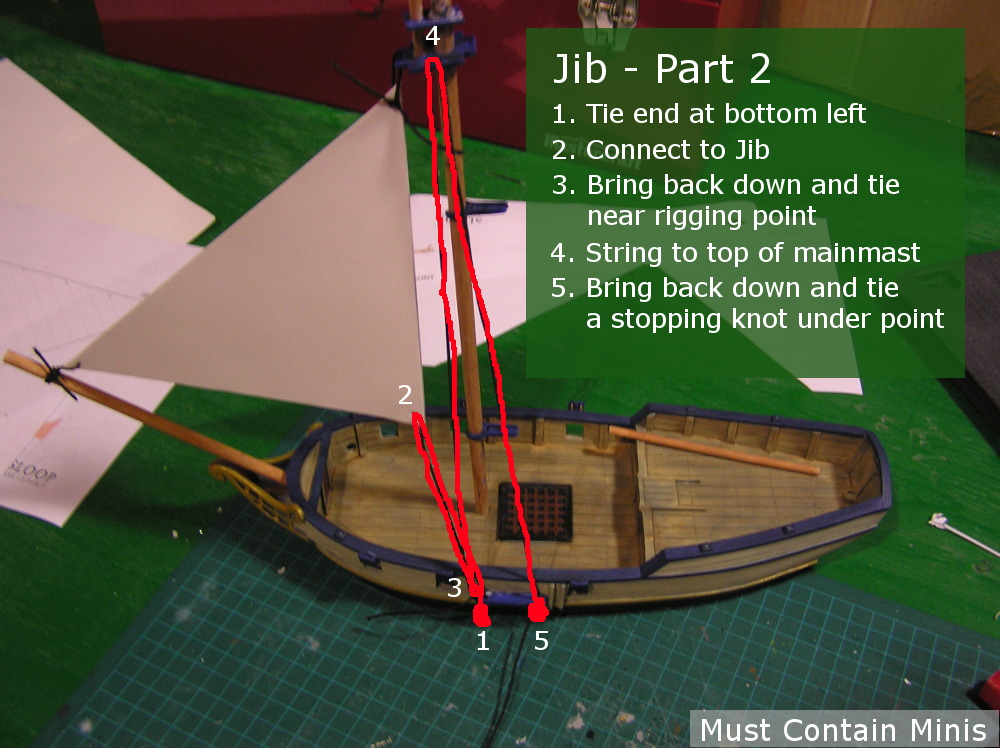
With my initial mistake out of the way, let’s take a look at how I put the rest of the model together. In the pictures below, you will see red and blue lines for where I tied my strings. As far as knots, I used a mixture of hitch-knots, reef-notes and granny-knots. Try not to use granny knots as they are not the best. I used them because I am not a master of tying knots. 🙂
Please keep in mind that this model (and therefore tutorial) were built through trial and error. Did I complete the rigging in the best way possible? I am not sure. What I do know is that the rigging looks fantastic on the finished model and looks to follow the Firelock Games’ diagram well.
The Jib
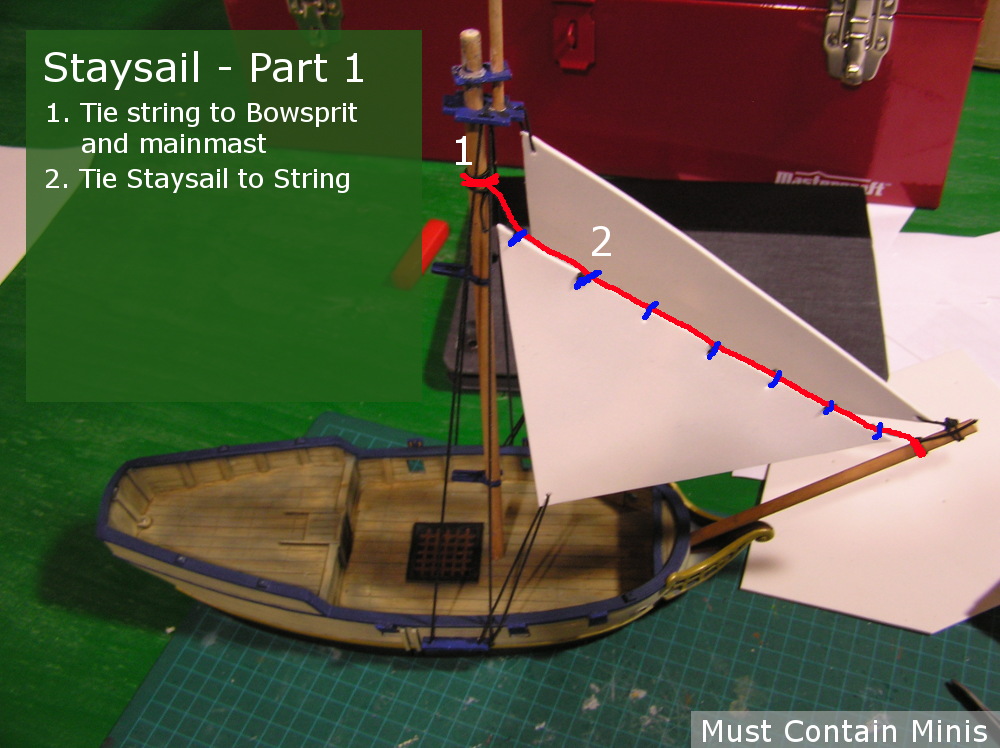
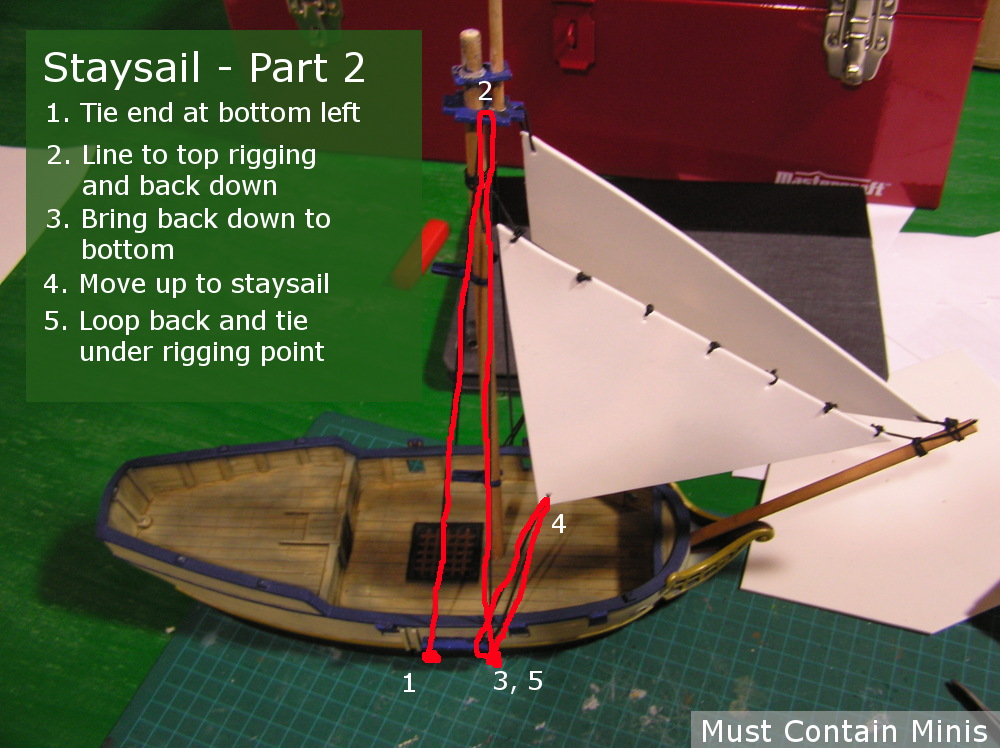
The Staysail
The first part of getting the Staysail up is to concentrate on attaching it to the Mainmast and Bowsprit. The red string represents step one while the blue is step two.
The Gaff
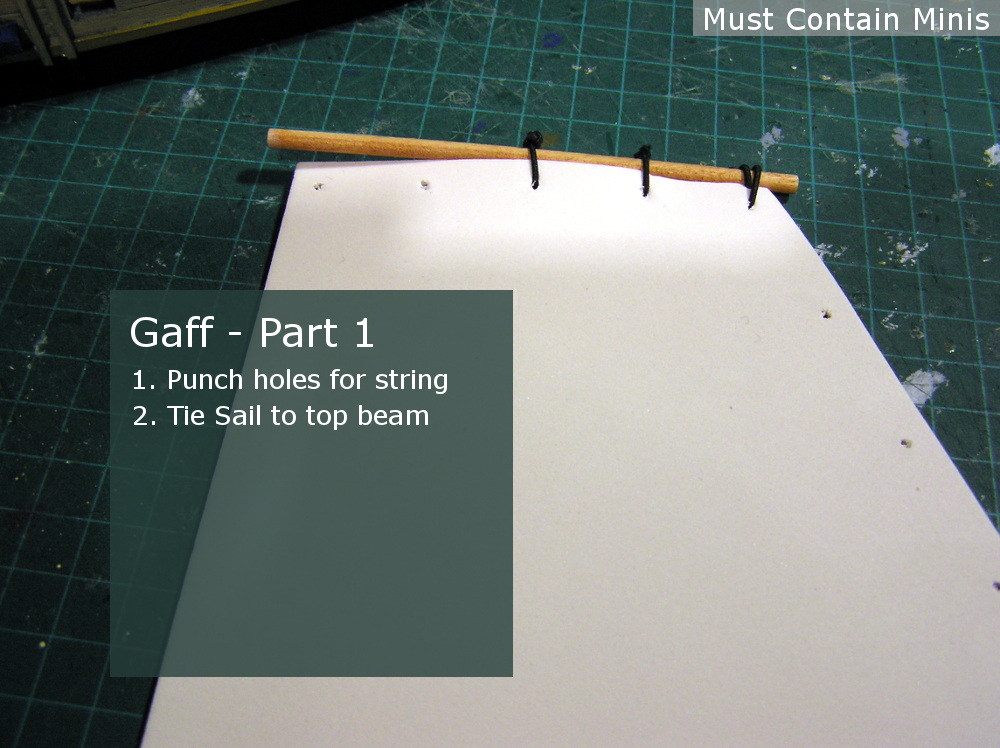

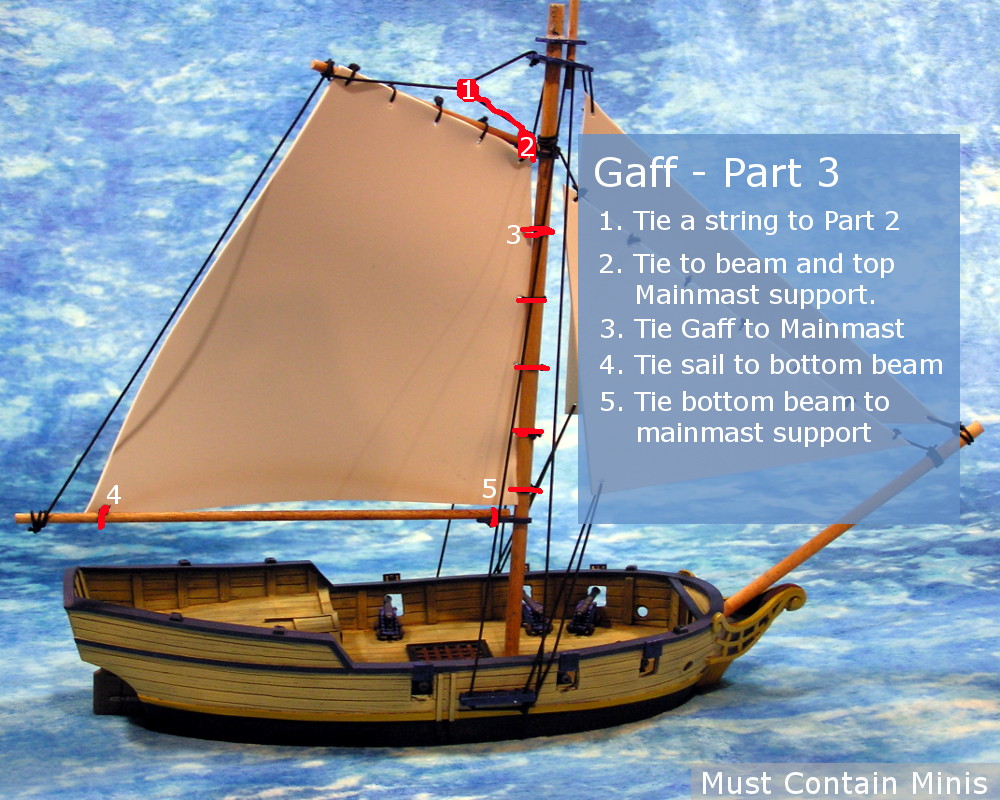
Rigging Completed
Once you finish the above steps, your sloop will be complete.
Be sure to not cut the string until after you are done the tie. For the short lengths, I cut the string into smaller pieces and tried to use those smaller pieces to tie the gaff to the mainmast. I found that I did not leave enough slack and could not use the strings that I prepared. To the craft-store I went to buy some elastic string so I could finish the model.
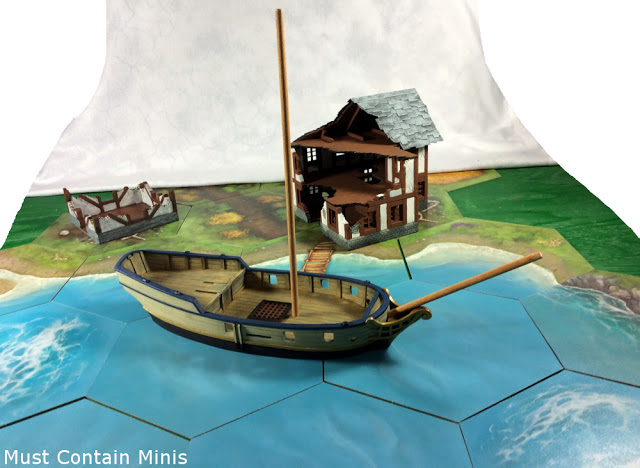
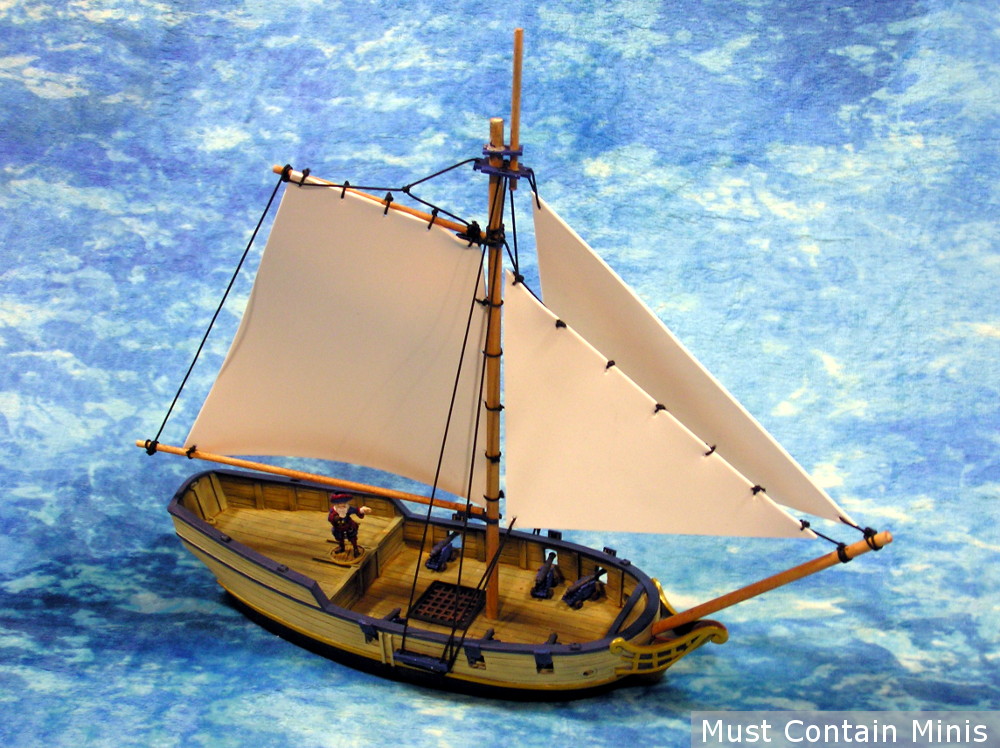
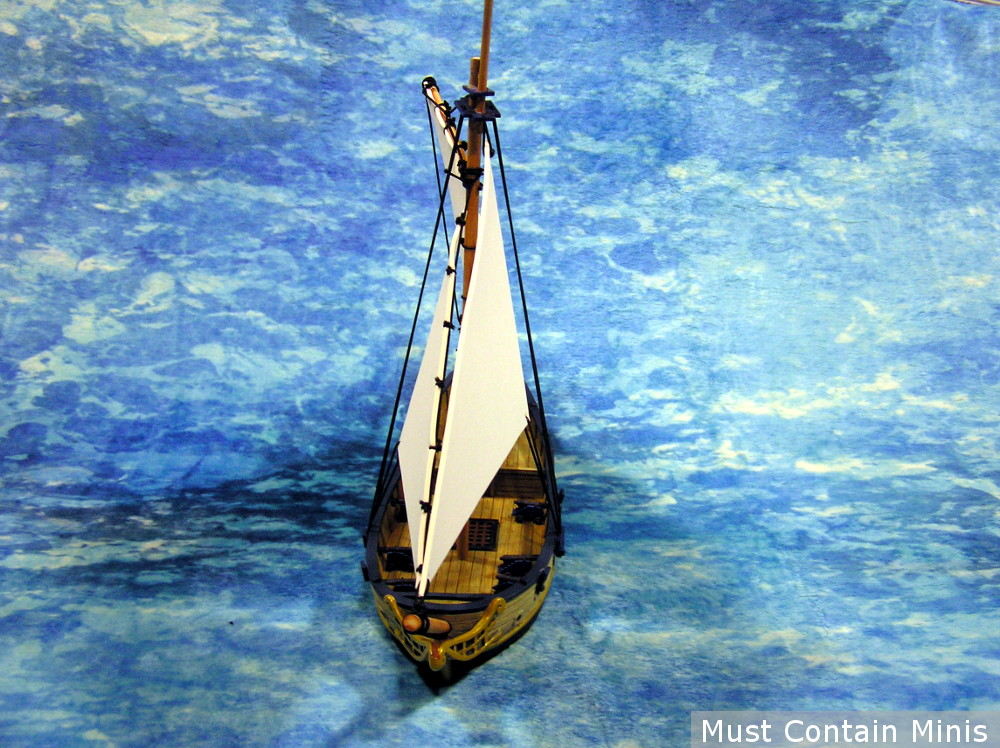
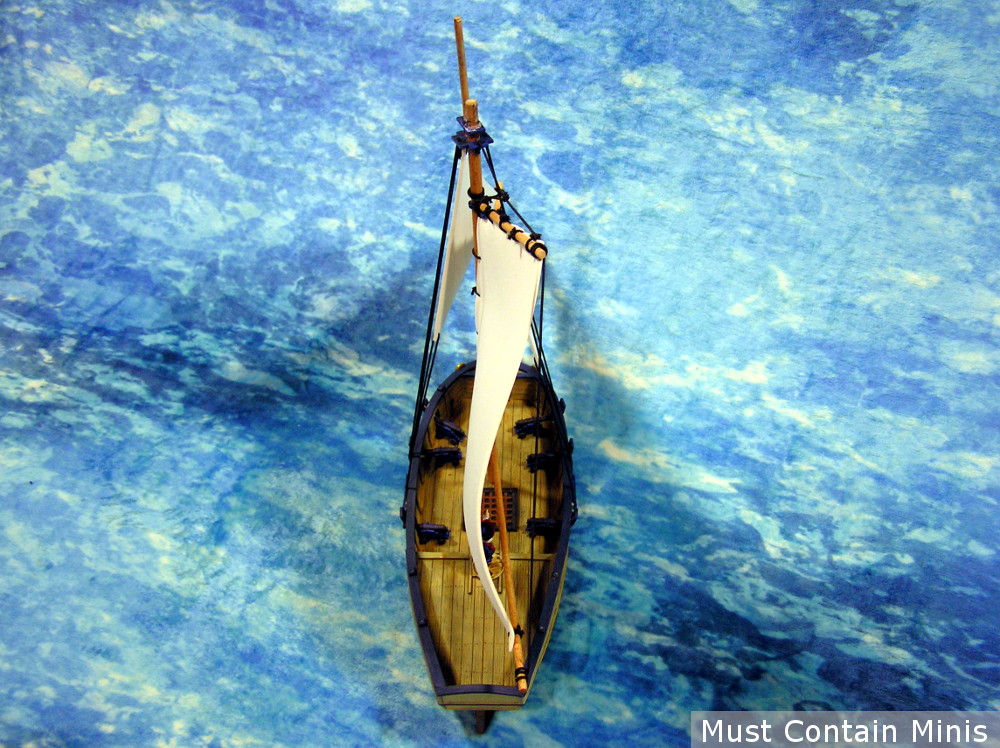
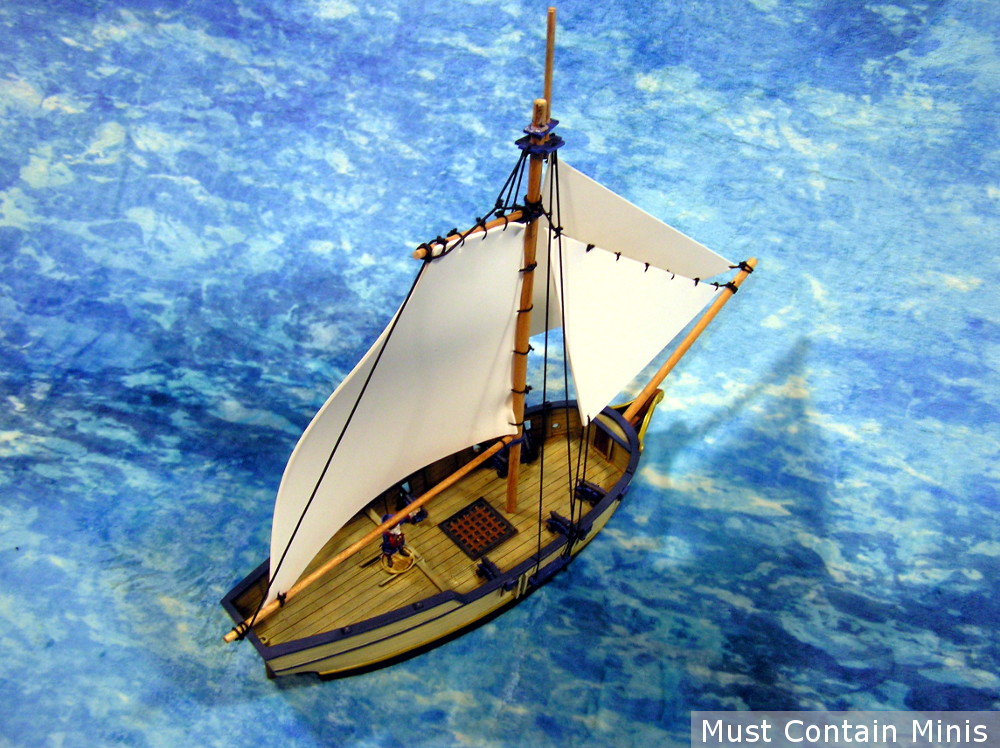
Showcase Pictures
Below are a few more showcase pictures of the Sloop.
Special Thanks…
Special thanks goes out to Firelock Games for Providing this miniature ship to Must Contain Minis.
Thanks also goes out to Jeremy Cada of Forbes Hobbies for painting the hull of the ship, RAINN Studios for the TerraTiles in the Background of one of the photos, XOLK for the Ruins in the same picture and to Cigar Box Battle for the Battle Mat used in the showcase pictures of the Sloop.
Support Must Contain Minis
If you run a company and have a miniatures related product that you would like to see on this website, please email us at mustcontainminis@gmail.com. We would be happy to discuss your products with you and figure out if there might be a fit.
Hopefully everyone enjoyed this Tutorial, Showcase and Review. Please feel free to let us know what you think of the model in the comments section below.
Until next time, Happy Gaming Everyone!!!

Pingback: Crossover Gaming - Blood & Plunder Ship meets Frostgrave Ghost Archipelago Boats - Must Contain Minis
Pingback: The Local Paint Bar - Free Paint Lessons and Commission Painting Services - Must Contain Minis [MCM]
Pingback: Blood and Plunder Canoa and Piragua - Work in Progress - Must Contain Minis [MCM]
Pingback: Blood & Plunder Arrivals - May 2019 - Must Contain Minis [MCM]
Pingback: Painted Captain Morgan Miniature - Must Contain Minis [MCM]
Pingback: Bermuda Sloop Preview - Blood & Plunder - Must Contain Minis