In today’s Bolt Action Battle Report, 1200 points worth of Germans take on the British in a Late War battle over a little town. Check out this table. Just stunning!
 |
| Check out this gaming table. Simply Beautiful!!! |
The Armies
My opponent tonight is Jeremy Cada of Forbes Hobbies. Below is his army.
 |
| Jeremy’s Germans are well camouflaged on the cobblestone streets. The items of note in his list include two large platoons of troops, four small 5 man teams, a small 7 man unit, a medium mortar, an MMG team and a StuG. I believe that the entire list is rated as Veteran. |
Below is the army that I brought to the table. To be honest, I was hoping to play Sea Lion, so parts of my army are actually kitted for Early War instead of Late War; however, I was able to add a few extra pieces and presto, I had a Late War army with a retro tank hunting unit.
 |
| Above is my 1200 point British Army for this battle. In this army, I have two Forward Observers, a 3 man First Lieutenant unit, an anti-tank rifle team, a light mortar team, an MMG team, two 9 man rifle squads with an LMG each, a 6 man Commando team with an LGM, a medic, a Universal Carrier (as an armoured Car Option) and a Sherman. My entire army is rated as veteran (except for the free Observer and his helper). |
Before deploying the armies, we posed them for photos.
 |
| This shot is posed, but above we have an onslaught of German Soldiers rushing the entrenched British soldiers defending this little town. |
 |
| A higher angle. |
For the scenario, we chose to play “No Man’s Land.” To make things interesting, we discussed alternative optional rules to use with the scenario. We thought about using the “Command & Control Breakdown” rule that I used in my last Battle Report, but instead we decided to house rule a stealth rule.
House Rule
In a regular “No Man’s Land” mission, units on the board may start hidden. We discussed how the regular Bolt Action Rules give hidden units a bonus to defence, but you still know what those units are and where they are on the table. Knowing where the units are means that we can keep our tanks clear of any hidden anti-tank assets.
Deciding to do something different, we discussed how other games deal with hidden units and ambushes. Being a collector of rules, I have a lot to draw upon. We settled upon a rule inspired by “Blinds” from Guy Bowers’ Black Ops.
The crux of the rule is that you don’t 100% know where the enemy units are. To represent this “Fog of War,” one can use cards. Not having regular playing cards, we improvised by using Magic Cards and wrote on them what units they represent.
 |
|
A picture to demonstrate house rules for the “Blinds” or stealth units in Bolt Action. We decided that there would be no observation checks and that a “blind” unit would be revealed if any unit gets line of site on it. Line of site from cards would be drawn from any corner. If any corner can see three or more corners of an opponent’s card, then it is revealed. We also decided that “blinds” would be revealed when an opponent got a certain distance from them.
Each side would be given four units that they could hide as a “blind” and four fake “blinds.” In this way, the opponent sees 8 cards, knows that four of them represent specific units and four of them are distractions. My “blinds” were one 9 man Rifle team, an Anti-tank Rifle team, a MMG team and a Forward Observer.
To keep the opponent guessing, we gave each “blind” an activation die. This means that both sides had four extra activation dice for the game. The extra would be removed from the game (and not counted as a casualty) when the “blind” is revealed.
|
 |
| In this house, I put down a unit. Jeremy does not know what it is, or if it is one of my four fake units. |
 |
| I know it is a 9 man Rifles squad with a Bren and Anti-tank grenades. |
 |
| Likewise, Jeremy placed two “blinds” in this house here. I do not know what they are or if they are one of his four fake “blinds.” BTW… as a hint of what is to come, check out how tight Jeremy placed those units. Guess who brought two Forward Observers to the fight! |
This extra rule worked out very well, but if we use it again, we will likely use face up playing cards and secret lists. We found ourselves losing track of which cards were fakes with the magic cards used the way we used them.
To keep things simple, we skipped “Preparatory Bombardment” and treated the blinds as normal units, for the most part.
The Battle
Most of the units were set up as “blinds” in houses. Jeremy had a five man squad and mortar team as regularly deployed “hidden” units. I had a single light mortar team as my only regularly “hidden” unit. The rest were kept in reserve or true “blinds.”
 |
| A repeat picture to give context of the battle ground. |
 |
| Jeremy’s 5 man squad and medium mortar team started the game as hidden units rather than as “blinds.” |
 |
| My hidden unit was this light mortar team here. Everything else was either a “blind” or in reserve. |
Right off the top, the British light mortar team fired at the five man squad. I rolled a 6 to range in and even happened to kill one of the men in the unit with a couple more 6s.
 |
| I scored a hit on this unit right off the top! |
 |
| Even killed a man with the light mortar round. Unbelievable! |
In retaliation, Jeremy fired his popped a sniper and killed my mortar team with a single shot.
 |
| One of the blinds was revealed to be a German sniper and took an expert shot at my light mortar team. |
 |
| After that, no light mortar team remained. 🙁 |
Jeremy then fired off his medium mortar at the house containing my MMG team “blind.” He missed. I then revealed my first Forward Observer and called in a barrage.
 |
| These guys started to range in on my unrevealed units. |
 |
| I then revealed my Forward Observer and called in my first artillery strike. |
At the end of the first round, the Germans are winning one kill to none, but that would change soon.
 |
|
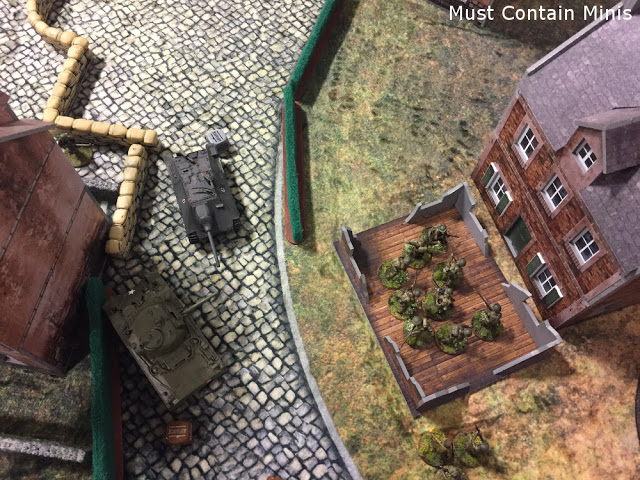
That coin in front of the house is where I called in the artillery strike. Around that marker, the Germans have one five (now four) man squad, a sniper team, three binds, and a mortar team. The barrage hits hard and places pins all around. It also manages to wipe out the medium mortar team and crashes down the right side of the duplex killing a “blind” distraction card and a “blind” mmg team.
|
The sniper is still in the building and uninjured from the artillery barrage. The British draw the first die and bring their Sherman out from reserve. They fire a shot of HE at the building with the sniper. Bang!!! No more sniper!
 |
| The Sherman advances onto the board and nails the sniper with a round of HE. |
 |
| Eliminating the sniper issue! |
The Germans then tried to bring on their StuG, but its crew didn’t feel like fighting yet. The British now have three kills to the Germans’ one. The rest of the round consists mostly of troop movements and the British revealing their “blinds” to fire at units in the open.
 |
| The British revealed this blind to be an MMG team. |
 |
| They open fire and kill two men from this 5 man squad. |
 |
| The second British Forward Observer runs onto the table with a clear line of site to the same bombardment region as what was used on the first round. I was certain to not draw attention to this unit being on the board (not that Jeremy had anything in range to attack it anyhow). |
 |
| Some infantry move in and use the Sherman for cover. |
 |
| More Germans enter the battle. |
 |
| I revealed this “blind” to be a nine man squad with a Bren. They open fire at the Germans running across the street to assault my “blind” unit in the adjacent building. |
 |
| One of the soldiers is killed from the gunfire. |
 |
| They enter the house to find that the unit they assaulted was one of my fake “blinds.” An easy win for the Germans. Pffft…. A rifle shot takes down one of the four soldiers in their newly acquired house. |
 |
| The British Commandos come out of reserve and take shots at the unit in the house. |
 |
| I notice now that my Universal Carrier is a little closer to the enemy than I want. Moving it will be one of my higher priorities on my next turn. As a note… the house in the street is not really there. It is the top floors to the house on the left. |
 |
| The “blind” above is my Anti-tank Rifle team and I move it along cover so it would not be revealed. |
The round now ends with the British leading three kills to one. For the next round, units would continue to whittle each other down, but the key action is below.
 |
| The Germans advance a 7 man unit of heavy firepower. They are leading with two LMGs there. |
 |
| The second Observer calls in an artillery barrage… |
 |
| Just a little to the right of the first one in hopes of hitting the house on the right. There is also a unit in the “ruins” directly in front of the coin. |
 |
| The Germans Race a StuG up the road to take on the Sherman. |
At the end of the third turn, the score would not alter; however, the Germans would suffer their second direct hit from a barrage of British guns.
 |
| 11″ was rolled as the blast template, which basically catches everything Jeremy had in the area. Another unit is killed. |
 |
| The British move their tank up to take a side shot on the StuG and Miss. |
 |
| The StuG reverses, fires and also misses. |
 |
| The British Anti-tank Rifle team advances and fires on the StuG. They also miss. |
 |
| As an extra unit to deal with the StuG, I place a unit of 9 soldiers in a near by house. They have anti-tank grenades. I wasn’t too worried about the StuGs gun on the infantry squad because it was running with an anti-tank gun instead of a howitzer. |
At the top of the 5th round, the score is 4 to 1 for the British. The battle rages onward, but the key piece of action this round is that the British take out the StuG with the Sherman. The score is now 5 to 1.
 |
| The Sherman takes out the StuG. |
 |
| As a smart technique planed by the Germans, that StuG wreckage now blocks the Sherman’s access to the battlefield. This would be the last useful hit that the Sherman makes this game. This image was taken by Jeremy Cada of Forbes Hobbies. |
The next round would start with some fire between buildings.
 |
| A large German squad occupies the house to the left. In the house on the right, is one of my 9 man squads. They take a lot of fire and receive a pin and a wound. |
 |
| But wait a minute… There is a medic behind the building! I roll a six and the wound is negated! |
 |
| Back on the other side of the table, my last two Commandos succumb to heavy German fire. The score is now 5 to 2. |
 |
| In desperation for more kills and in hopes of a turn 7, Jeremy rushes what is left of his smaller squads across open ground. His hope is to get the first die on turn 7 and assault that Universal Carrier. Lucky for me, there would be no turn 7. The dice certainly favoured me tonight. |
And there you have it! The British win in a 5 – 2 victory over the Germans. I had a blast playing this game and Jeremy was a great sport. He might have turned the score around if we made it to round 7. The fact that I rolled so well with my Forward Observers really helped my side attain the victory.
I hope that you enjoyed this battle report. To end, I would like to leave you with something that you don’t see much on Must Contain Minis. That’s right, it is a Picture of me! Thanks for being such a great opponent Jeremy. 🙂
 |
That’s me, Jacob Stauttener, of Must Contain Minis enjoying an excellent game of Bolt Action!
Image taken by Jeremy Cada of Forbes Hobbies. |
Until next time, Happy Gaming Everyone!!!
Great report with lovely pics of the superior table and models. We have been getting right into our SEALION 500 point Patrol Scenarios. There is something intense about the smaller games were every dice is critical.
Little games of 500 points are a lot of fun. Thanks for commenting on the Blog!
Sounds great, what a beautiful looking game! Love the terrain especially, the observer behind the windows and this most impressive fire marker…excellent report!
Thanks Phil!
Pingback: Chain of Command at Broadsword 7 - Must Contain Minis [MCM]
Hi there. A bit late to the party but I have to say I loved your battle report, and this only reinforce my will to play a Bolt Action game ! I already have a bunch of units (mostly Russian vs German in winter, and I bought the Band of Brothers starter set), and with the pandemic time we have to live, I will play mostly solo.
Just a little side note here : I noticed that in the picture the German tank destroyer is not a StuG but a Hetzer. Don’t know if you used the StuG stats for the game, though. Anyway, great report !
Welcome to the party. Thanks for the note on the Hetzer. Not sure which stats we used as the game was so long ago.