Today’s showcase is that of a Townsfolk Undertaker by Reaper Miniatures. I believe that I picked him up from RAFM Miniatures.
 |
| The Townsfolk Undertaker by Reaper Miniatures. |
The Miniature
This is a nice looking miniature.
My paint job does not do him justice, but I wanted to go forward with this post anyhow to serve as a learning lesson to some of my readers (who might be just starting out) and as an interest piece for those more experienced with miniatures.
It started out very well. I followed my standard procedure of base coat, wash, and highlight. When it came to the highlighting though, I applied too much yellow while trying to achieve a lighting effect.
Because I have so many other projects on the go, this is the state in which he will remain.
Please feel free to leave behind constructive criticism that could help me or my readers. Try not to be mean as it can scare some people away from the hobby. Part of Must Contain Minis’ Mission is to encourage miniature gaming in general. One way to do this is to show that not all miniatures have to be painted ‘perfectly’ for us to enjoy our hobby and the games we play.
My Paint Job
Now, let us take a look at the miniature that I painted….
 |
| Above is my painted Undertaker from the back side. |
For the most part, I am happy with how the model looks from the back. The lighting effect is subtle enough and nothing is too glaring other than perhaps the yellow lining on his left pocket.
A sharp-eye will pick out that there is a small air bubble under the left shoulder pad. I am not 100% sure what caused that bubble. I did rush this model because I wanted to use him in a game the very next day. Perhaps the bubble is from using the paint too thickly or maybe they were introduced when I shook my paints before using them. If you know what could have caused that bubble / hole, please leave a friendly comment below and suggestions for how to avoid them in the future.
Now lets look at this model from a couple of different angles.
 |
|
In this picture, you can see my mistake with painting the miniature. I lined the model’s high points with yellow hoping to achieve a stronger lighting effect. The end result was not what I was after. It is too bold. I should have stuck to dry-brushing instead of lining the miniature with yellow.
Although I went a little crazy with the yellow, I do want to point out some things that I like about the finished miniature. Look at his hand on the left. I am really happy with how that shading and highlighting turned out between his fingers. I am also very happy with how the lighting effect turned out on the shovel. For that, I highlighted the shovel yellow on the corners that I wanted to emphasize and then painted that yellow over with bronze again. This made for a lighter bronze than what was on the rest of the shovel.
|
 |
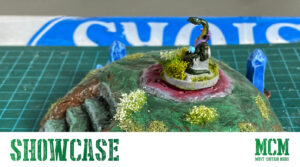
| Yep… I went a little too solid on the lighting effect. Oh well, I have learned from this experience and the next mini will be better. I am happy, however, with how the highlighting turned out on the shovel and the shading on the fingers. That looks nice. 🙂
Basing miniatures is one area of the hobby that I really enjoy. No matter the paintjob, I always believe that a well based model really helps complete the miniature. In the base above, I used a yellow flower near where the light is emitted and believe it helps emphasize the look I was after. I used the same flowers with the Major in the next picture below. |
Criticism
In the pictures above, one can see that I went too heavy with the yellow in trying to create a lighting effect. In the past, I have done a very similar technique to good effect. The difference is that above I lined the yellow highlights instead of just dry brushing. As a result, not enough of the original pigment shows through. Check out my British Major below. The effect worked much better on him because the yellow is more subtle. I also added a picture of my Necromancer Apprentice from Frostgrave as I am really happy with the shading on that model and the glowing effect that I added from the gem. For the gem’s effect, I used the same technique, but with a different colour of paint.
Other Minis I Painted
 |
| I used a similar lighting effect on this miniature above and it worked out perfectly. The difference is that I stopped after a light dry-brushing of yellow where as on the Undertaker, I took the yellow way further. |
 |
| Likewise, I am very happy with my shading and highlighting jobs on the miniature above. This Necromancer Apprentice looks like he has a nice 5 o’clock shadow and the gemstone gives off a nice glowing effect. This is one of my favourites that I have painted so far. |
While my Undertaker did not turn out as good as my Major or Apprentice (pictured above), he is still perfectly acceptable to use on the tabletop. In fact, I used him this weekend as my Necromancer Wizard in Frostgrave.
He looks just fine with the rest of his warband.
 |
| Despite the over-highlighting of yellow on the Undertaker, he looks great on the gaming table with the rest of his warband. |
 |
| From a tabletop distance, his excessive amount of yellow is not much of an issue. He looks good. |
My Undertaker has already seen use in a new Frostgrave campaign and I plan to potentially use him in the new Frostgrave: Ghost Archipelago. This figure would also be great in Role Playing Games like Dungeons and Dragons or Pathfinder. What games could you envision using him in?
If you are wondering how I painted the Undertaker, below is a list of the colours I used.
- I started by painting the entire miniature black with Vallejo paint
- I then painted the skin with Barbarian Flesh by Wargame Painter paint
- I painted the leather parts of the model with German Medium Brown by Vallejo (70-826)
- The cloak, boots and gloves I dry-brushed with Citadel “The Fang” paint
- I painted the wood parts and his hair with Battlefront’s Flat Earth paint
- The metal parts (armour and shovel) were painted with Vallejo Bronze paint
- I then gave the entire model a heavy wash with a watered down Drakenhof Nightshade by Citadel
- Then I gave the model a light watered down wash of Nuln Oil by Citadel
- I then selectively dry-brushed and “lined” every colour back up using the original colours to create various levels of shades and colours
- Finally, I took what I had for yellow (three different shades of Craft Store yellow paints) and dry-brushed all of the lighting effects onto the model
- I then took the lighting effect too far by lining the raised areas of the model with yellow.
As I stated before, that is where this model will finish. I have other projects to keep me busy. Let me know in the comments below if you have any tips or techniques that you would like to share with myself and my readers.
Until next time, Happy Gaming Everyone!!!
Support Must Contain Minis
If you wish to help support Must Contain Minis, we have a sales affiliate relationship with DriveThruRPG and the Wargame Vault. If you make a purchase from either of those sites after using one of the links on this site, a portion of the sales goes towards supporting Must Contain Minis.

